Edit slides
Choose slide types, configure questions, arrange content, preview both views, and check saving.
1. Check access and find your editing areas
Open a presentation from your signed-in workspace. A view-only invitation notice means you cannot edit or control the presentation, so the Present button is not shown at the top. Ask the owner to review your access if you need to edit. If you see This presentation could not be found, the presentation was deleted or is not shared with the account you are signed in to. Select Back to my presentations and check the presentation link and your account. Could not load the presentation may be a connection problem, so select Retry.
If an invitation is rejected, check the reason shown. For This email is not registered., confirm the other person's registered email address. For You cannot invite yourself., enter someone else's email address. For This user has already been invited., check the existing collaborator list. For Only accounts with a verified email can be invited., ask the other person to open Settings → Profile → Email verification, select Request verification email, and finish verification from the link in that email, then invite them again. They can confirm the status has changed to Verified. If a general invitation failure or access revocation failure appears, try again later and check the success notice and updated collaborator list.
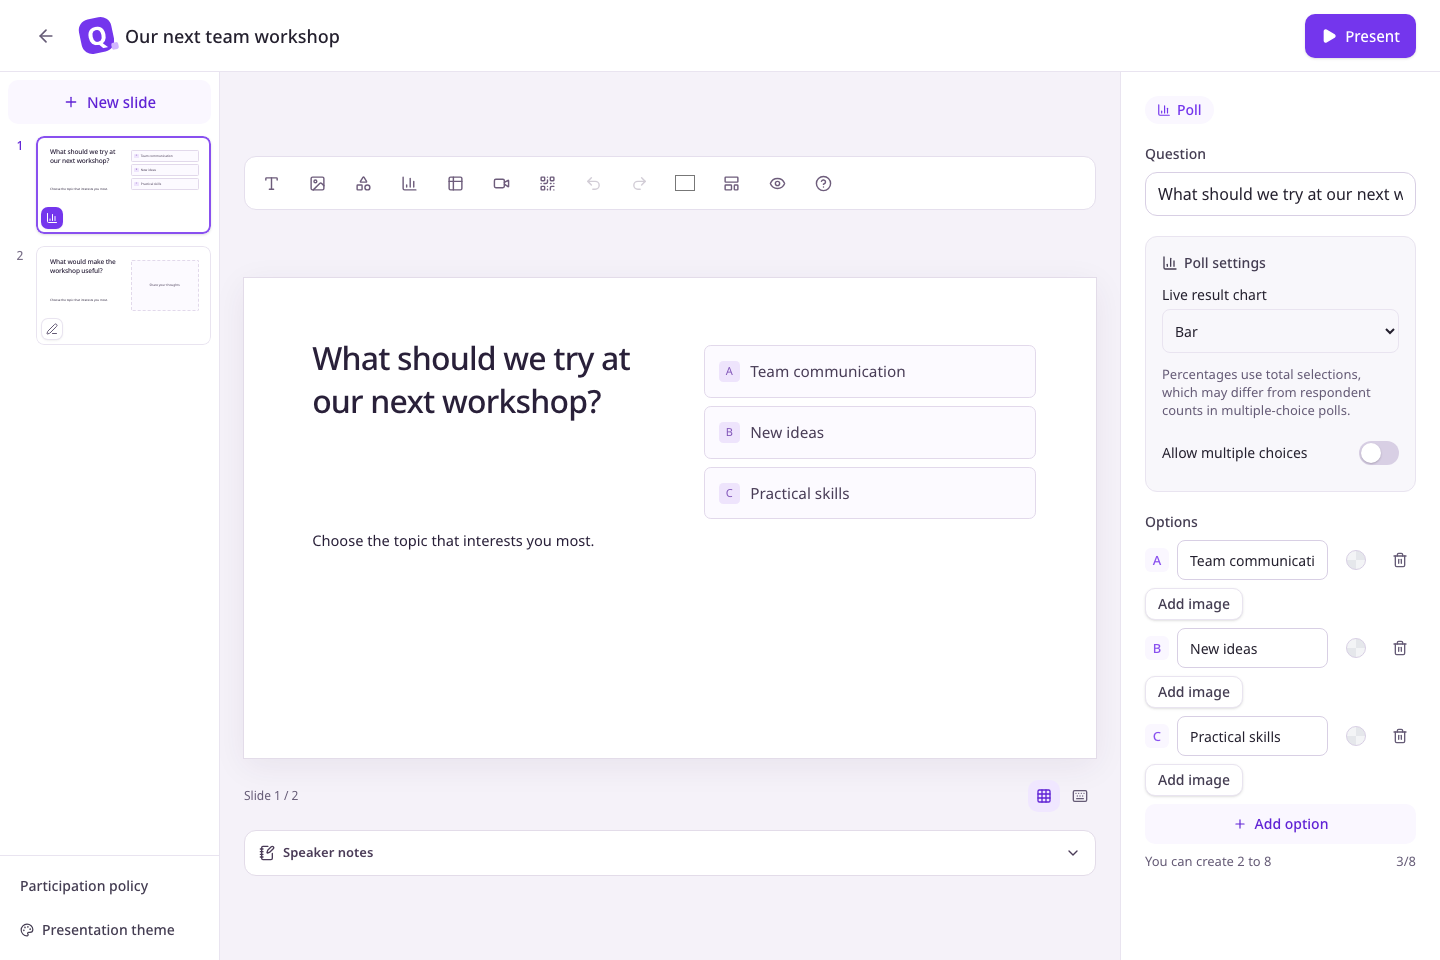
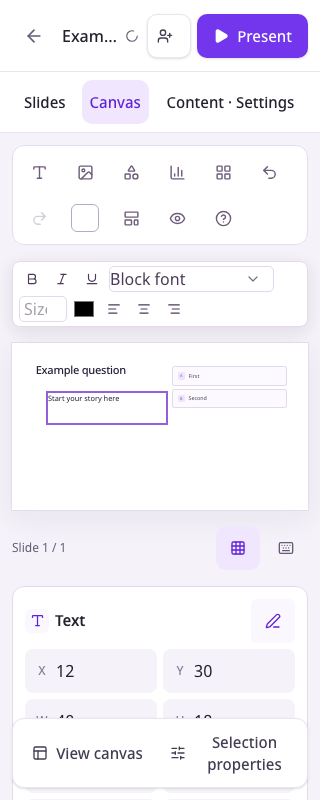
The top bar contains the presentation name, save status, and presentation action. The slide list is on the left, the canvas in the middle, and the selected slide's content/settings area on the right. On a small screen, switch between these areas using Slides, Canvas, and Content · Settings.
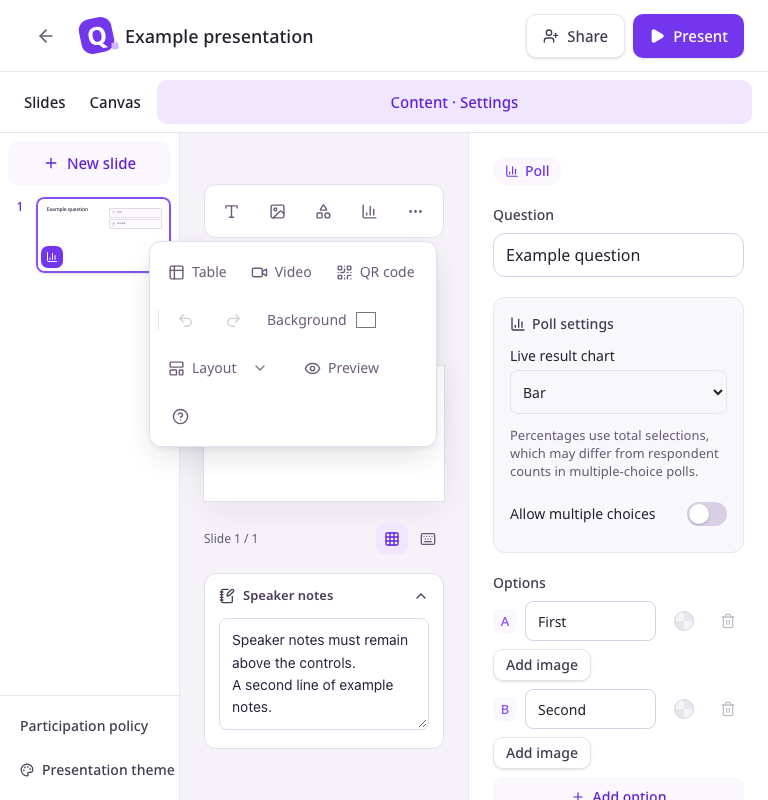
When the desktop canvas becomes narrow, open More tools (three dots) beside Text, Image, Shape, and Chart to find Table, Video, QR code, Undo, Background, Layout, and Preview. For example, open the content and settings panel, then choose More tools → Layout to change the arrangement. Press Escape to close the panel.
2. Add a slide and choose its type
- Select the slide that should come immediately before the new one.
- Select New slide.
- Search for a type or filter the picker by all types, interactive slides, content, or presets.
- Select the type. It is added immediately after the current slide.
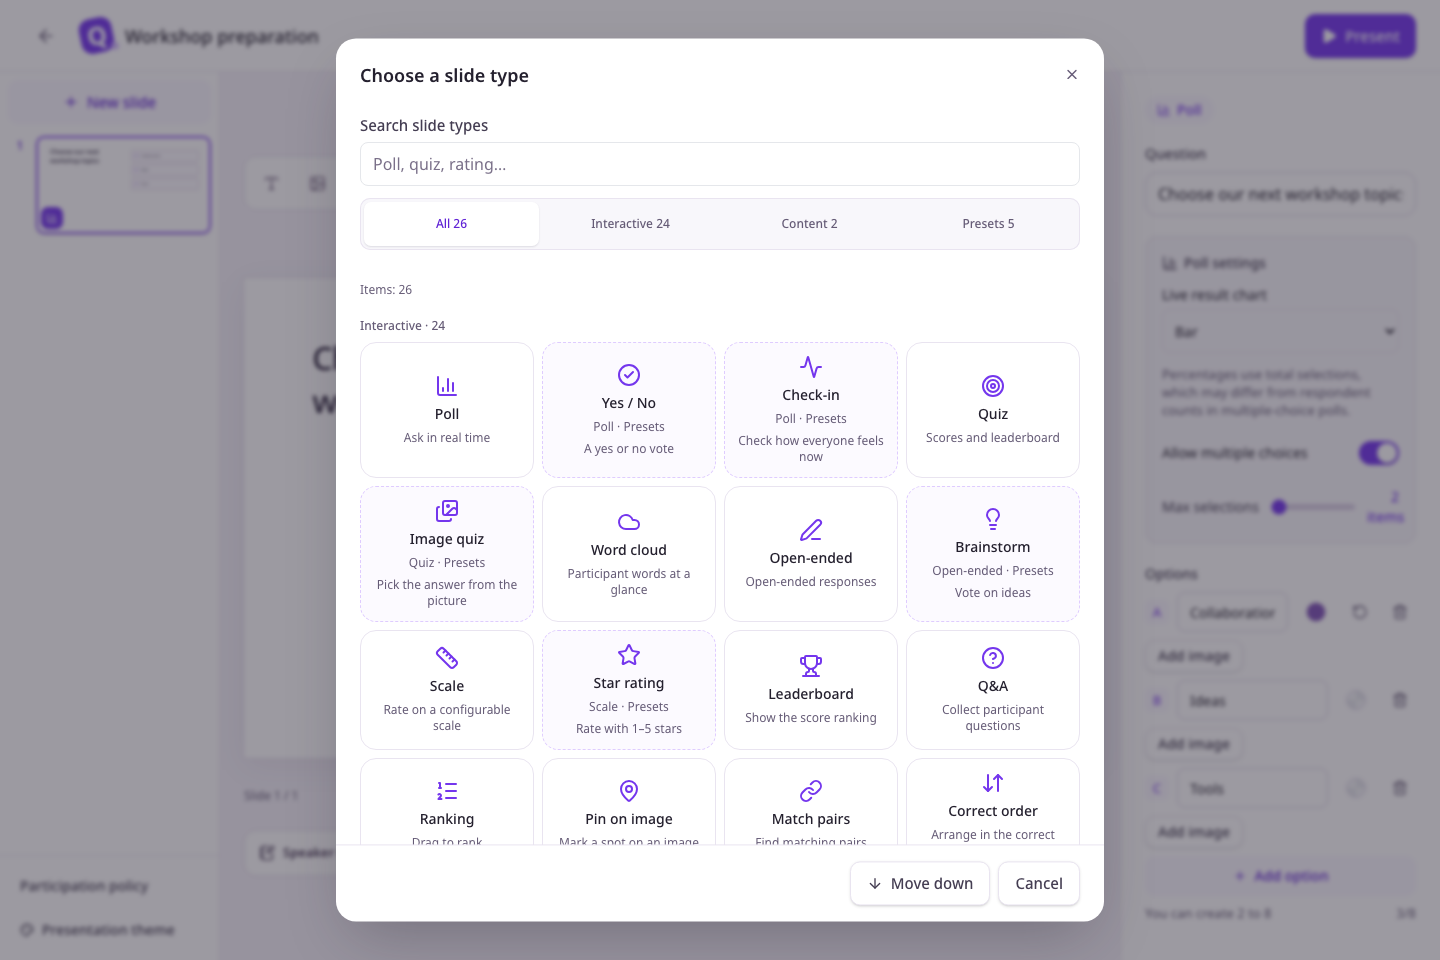
Use the search and category controls to find a type, then read its card description. Polls collect choices, quizzes check correct answers, word clouds collect short terms, and Q&A collects questions. Heading and content slides provide explanatory material.
With no search text, the picker shows All 26, Interactive 24, Content 2, and Presets 5. The five presets also belong to Interactive, so category counts are not additive. Yes/no and check-in sit beside Poll, image quiz beside Quiz, stars beside Scale, and brainstorming beside Open-ended. Each preset card shows its base type and a preset label.
For example, searching POLL finds Poll and its yes/no and check-in presets; yes/no finds the binary poll, and roulette finds the spinner. You can search localized names and descriptions, plus Korean and English aliases. Category counts update with the search results. Use Move down or scroll when more cards are below. Changing the search or category returns the list to the top. If nothing matches, reset the search and filters.
Video, QR codes, and tables are added from the slide's canvas tools, rather than picker cards. After selecting a type, check that a slide appears in the list. If creation fails, your search conditions stay in place so you can check the connection and retry the same card.
If a lock or limit message appears, check your current access. Slide types and slide counts are not all available without limits.
3. Write a poll question and its options
Select the slide and enter its question. Fill in each option and use Add option for additional choices. The color control next to an option sets its result-chart color.
With Allow multiple choices off, participants choose one answer. Turn it on to accept several choices and set the maximum. Check the displayed selection limit in the participant preview as well.
4. Configure quizzes and other question types
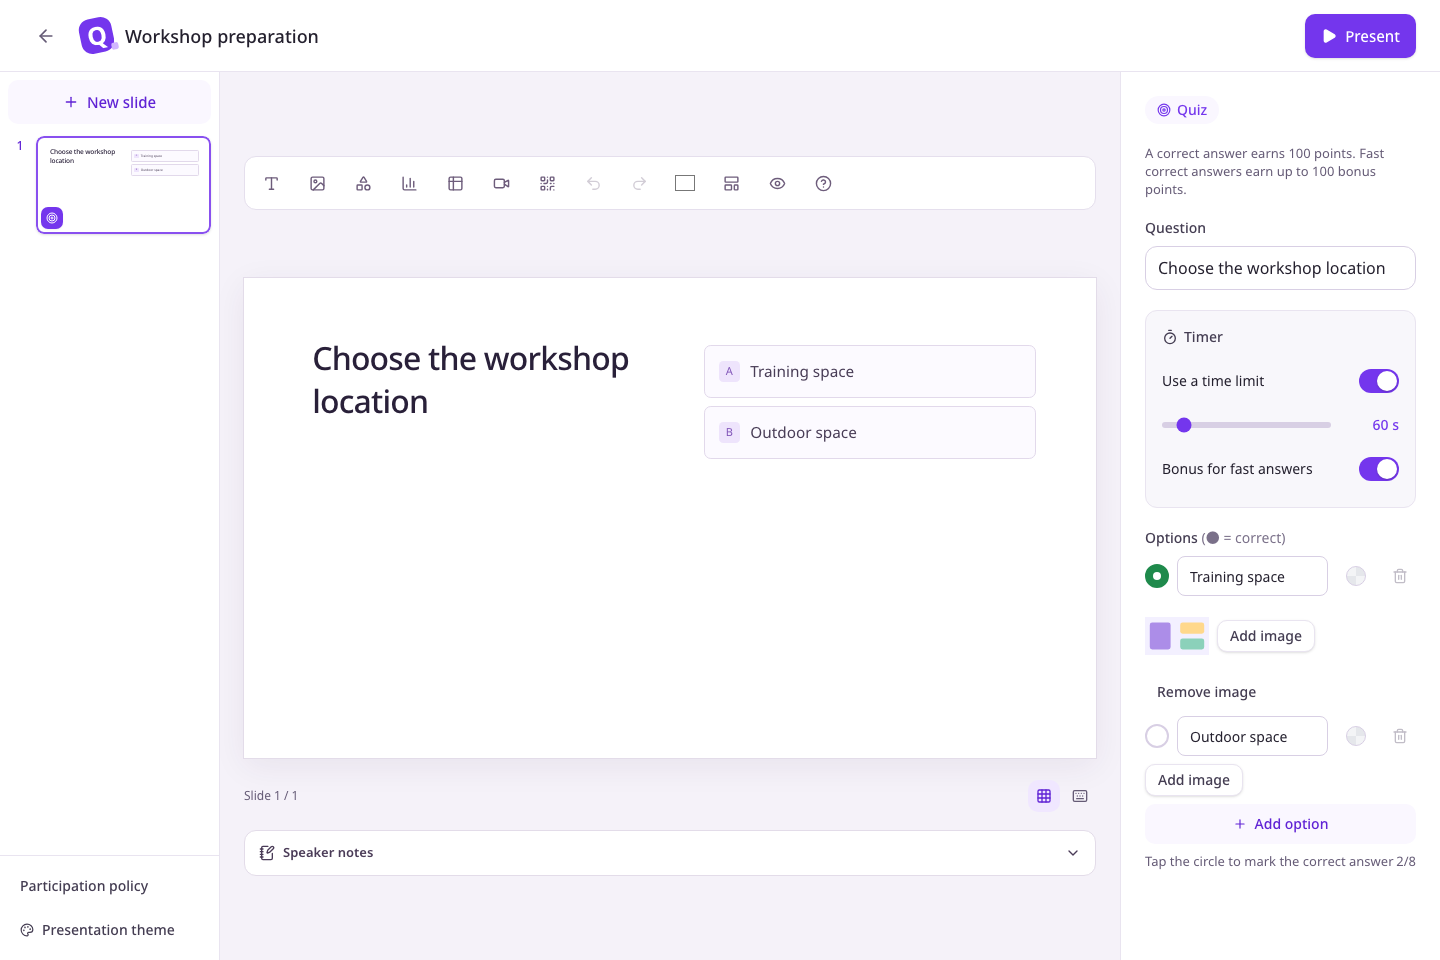
For a multiple-choice quiz, select the round button beside the correct option. Check the filled-circle correct-answer indicator. Review the time-limit and faster-answer bonus settings for your event.
| Type | Settings to check |
|---|---|
| Word cloud | Allow one or two words per participant. |
| Open-ended | Set the character limit and input hint. |
| Q&A | With question approval enabled, new questions stay hidden pending approval. Publish them from the Q&A panel while presenting. |
| Type-answer quiz | Enter up to five accepted answers separated by commas. Grading ignores case and leading or trailing spaces. |
| Correct order | Use Move up and Move down beside the options to set the correct order from top to bottom. |
Time limits are available for multiple-choice quizzes, type-answer quizzes, correct-order questions and number input. Enabling a time limit initially saves 60 seconds; adjust it with the slider. The faster-answer bonus control appears only for a scored question with a time limit enabled. Number input and type-answer quizzes award points only when a correct answer is configured.
Check the points guidance below the type label in the content and settings panel. Enter a correct number or a comma-separated list of accepted text answers to enable scoring. Clear the correct-answer input to return to an ungraded question. After saving, reopen the slide and check that the answer and timer settings are retained.
| Type | Points and correctness |
|---|---|
| Multiple-choice quiz and correct order | Correct answers earn 100 points; incorrect answers earn zero. Points and response times contribute to ranking. |
| Number input and type-answer quiz | The same scoring rules apply when a correct answer is configured. Otherwise, responses are collected without points. |
| Match pairs and pin on image | Checks pair matches or configured correct pin areas without awarding game points. Pins without a correct area are ungraded. |
| Categorise | Summarises assignments and compares them with configured categories in the presenter view. No game points are awarded. |
| 100-point allocation | Allocated values express opinions and do not add to game scores or ranking. |
With the faster-answer bonus enabled, correct answers earn up to 100 extra points, decreasing with the proportion of time remaining. For example, a correct answer submitted after 30 seconds of a 60-second question earns 100 base points plus 50 bonus points. Turning off only the bonus keeps the time limit and awards 100 points for a correct answer. Turning off the time limit also disables the bonus, even if a duration remains saved. Re-enabling the time limit restores the previous bonus setting, so check both controls. These changes do not recalculate scores already saved.
If the guidance is unexpected, check the configured correct answer, the time-limit switch and the faster-answer bonus switch in that order. Partial-credit and team scoring are not supported.
Settings change with the selected type. Correct-answer and timer settings for one type do not apply to every question.
5. Arrange content and slide order
Select text, images, or other canvas elements to adjust their position and size. Use the slide list to reorder, duplicate, or delete slides. For slides without responses, you can undo while the undo notice is visible. For slides with responses, check the slide number and response count in the confirmation dialog before selecting Delete. This deletion cannot be undone.
Double-click a text, question, or table block to edit its text in place. With a keyboard, press Tab to move to a block, which selects it, then press Enter or F2 to start editing. A table starts at its first cell, and Tab moves to the next cell. Press Esc to save what you typed and return focus to the block. Unlock a locked block before editing it.
If deletion fails, the slide returns to its original position and an error message appears. Resolve the issue described and try deleting again. On success, the slide disappears from the list and the previous failure message is cleared.
Hidden slides remain in the editor but are skipped during presenting. If every slide is hidden, all slides are shown instead; hiding slides does not block presentation access. If deletion is rejected because a slide is being presented, end the presentation and try again. Text inside an imported page image may not be separately editable. See import modes.
Response limits and answer submission
Multiple-choice polls save each selected option separately. Resending the same option does not add another vote. If submission fails, keep your selection and retry. Turning off the quiz time limit disables timeout rejection even when a previously configured duration remains. Word-cloud and open-ended submissions must respect the limits configured for that slide.
Images and correct areas
Under a poll or quiz option, choose Add image, upload a file or enter a public image URL, then choose Add by URL. SlideQ downloads an image added by URL once and stores it, so participant screens never connect to the original address. Only public PNG, JPEG, GIF, and WebP images up to 5 MB can be imported; addresses that require sign-in or exist only on an internal network cannot. Check the preview beneath the option. Use Remove image to clear it. If the upload or URL fails, check the file requirements or address and retry, or upload the file instead.
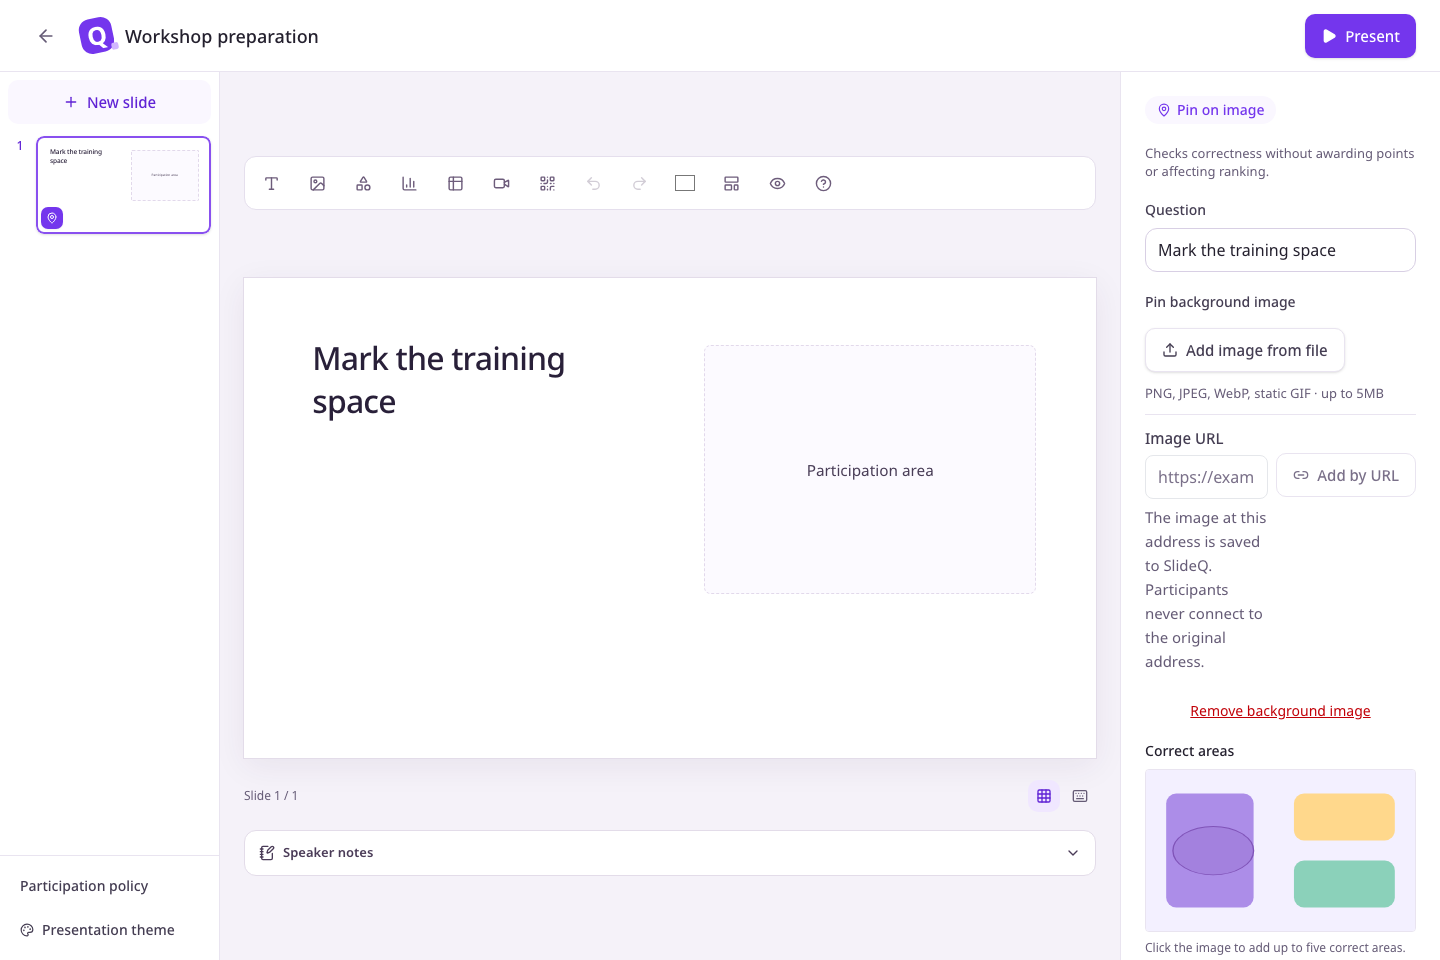
For Pin on image, set the background image first: upload a file, or enter an image URL and choose Add by URL. Add a new image to replace it, or choose Remove background image to clear it. Click its Correct areas preview to add up to five areas. Adjust Horizontal position, Vertical position, and Radius as percentages, or delete an area. These areas determine whether a pin is correct; they do not automatically award quiz points. Reopen the slide after saving to check that the areas persist.
For Correct order, use the up and down buttons beside the options. The correct order runs from top to bottom; deleting and recreating options is unnecessary.
Video, QR code, and table blocks
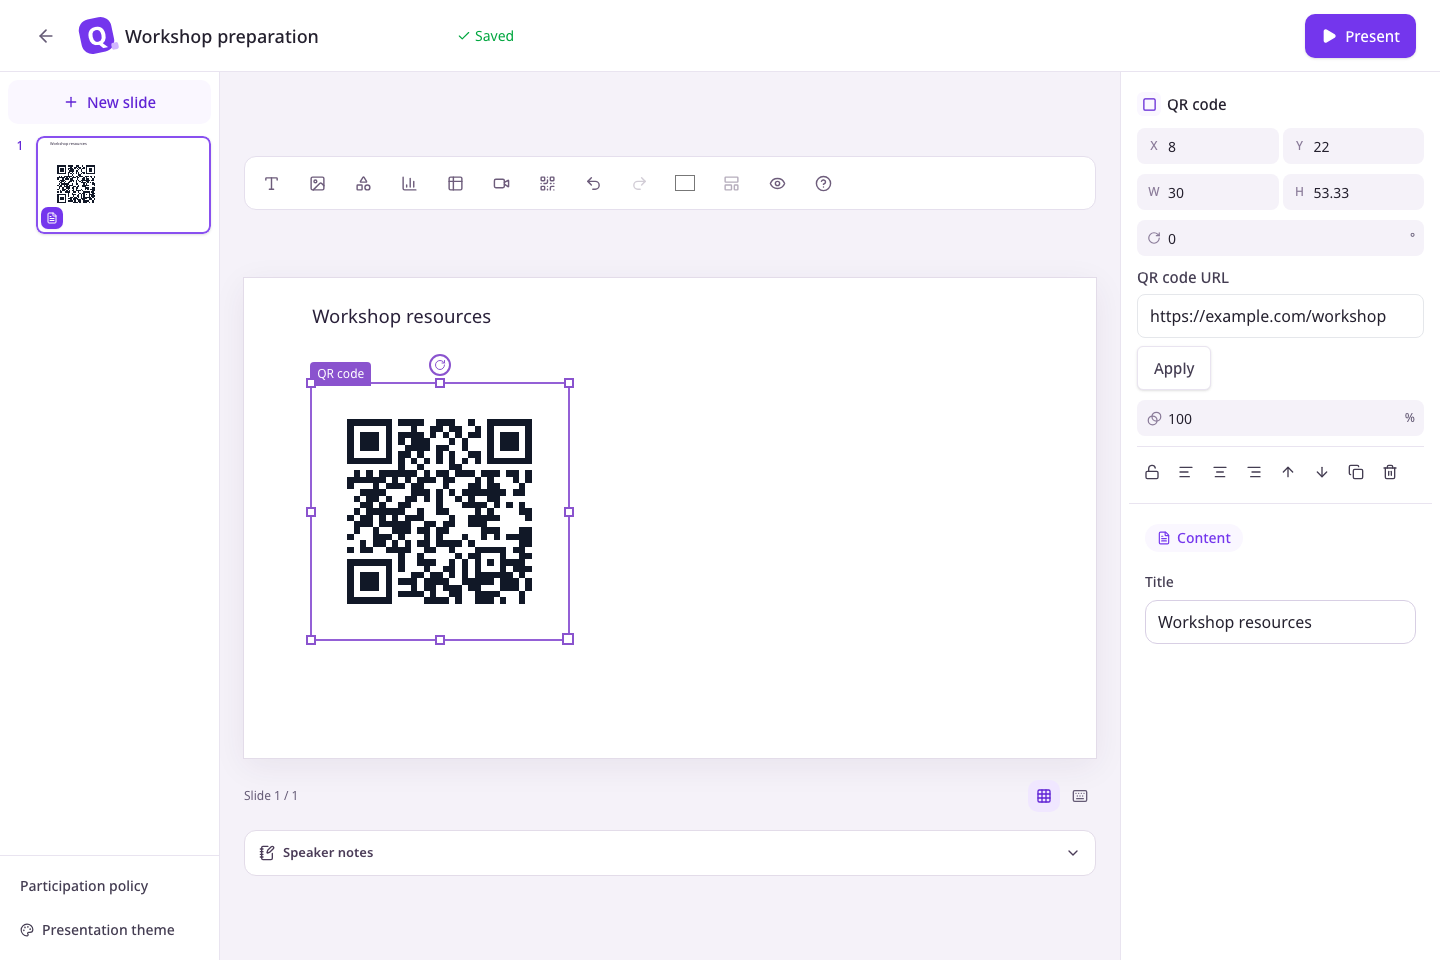
Choose Video, QR code, or Table in the canvas toolbar. On narrow screens such as phones, these three are in the Add content menu (grid icon). Select a video or QR block, enter its URL in the selected block's properties, and choose Apply. Video supports YouTube URLs and requires internet access and permission to embed the original video. Check the URL if an error appears. A QR block can point to an address such as https://example.com/workshop; it is separate from the presentation's join QR code.
Tables start with three rows and three columns. Edit cells and adjust rows, columns, and formatting through the table properties. Wait for the saved status, then reopen the slide to confirm the content persists.
6. Preview the presentation and participant views
Select Preview in the canvas tools. On a large screen, it shows the presentation and participant phone views together. On a small screen, switch between Presenter screen and Participant screen. Check text size, option length, and image cropping, then select Back to editing.
Answers in the participant preview stay within that preview and are not saved as live session responses. If the participant preview fails to load, use its retry guidance. A message saying the participant address is not configured requires service configuration to be checked.
7. Prepare participation policy and speaker notes
Open Participation policy and use Join after email verification to require email verification. This option needs email delivery to be configured. The optional allowed-domain field accepts up to five comma-separated domains; leaving it empty allows any email domain. Select Save in this panel and check the saved confirmation.
With email verification enabled, participant email addresses are recorded in reports. An address with a + alias, such as name+tag@example.com, is recorded as the same participant as name@example.com. Check that participants can receive verification mail before your event. Write speaker notes below the canvas. Notes opened in the presentation view can be visible to your audience when you share that screen.
8. Finish saving before navigating away
Slide changes save automatically; check the status at the top. The presentation name saves when you leave its input or press Enter. Present and the editor's return-to-workspace action finish pending saves before navigating.
If saving fails, keep your content in place and select Save again. Check the feedback even if only the presentation name failed. Seeing your input on screen does not by itself mean it was saved.
9. Recover from a save conflict
A save conflict means another tab or collaborator changed content and saving has stopped.
- Select Go back and review in the conflict dialog.
- Copy any text or other content you need from this tab to a separate place.
- Reopen the conflict notice at the top.
- Select Load latest content. On success, the editor replaces the slides with the latest saved version.
- Review and reapply any needed changes from your copy, then check saving again.
Before loading the latest content
Loading the latest content discards this tab's unsaved changes. It does not merge them automatically. If loading fails, the current tab's changes remain; check your connection and retry.
If an image upload is interrupted, check Image upload history. A message saying cancellation is being checked does not mean the upload has been canceled. Wait for confirmation that it was canceled, or check its status in the history.
Set a scale range and labels
Select a Scale slide in the editor and open Content · Settings. Use Min number and Max number to choose an integer range within 0–10. For example, choose 0–8 and enter Not yet, Somewhat and Fully in Scale label 0, Scale label 4 and Scale label 8. Each label can contain up to 80 characters.
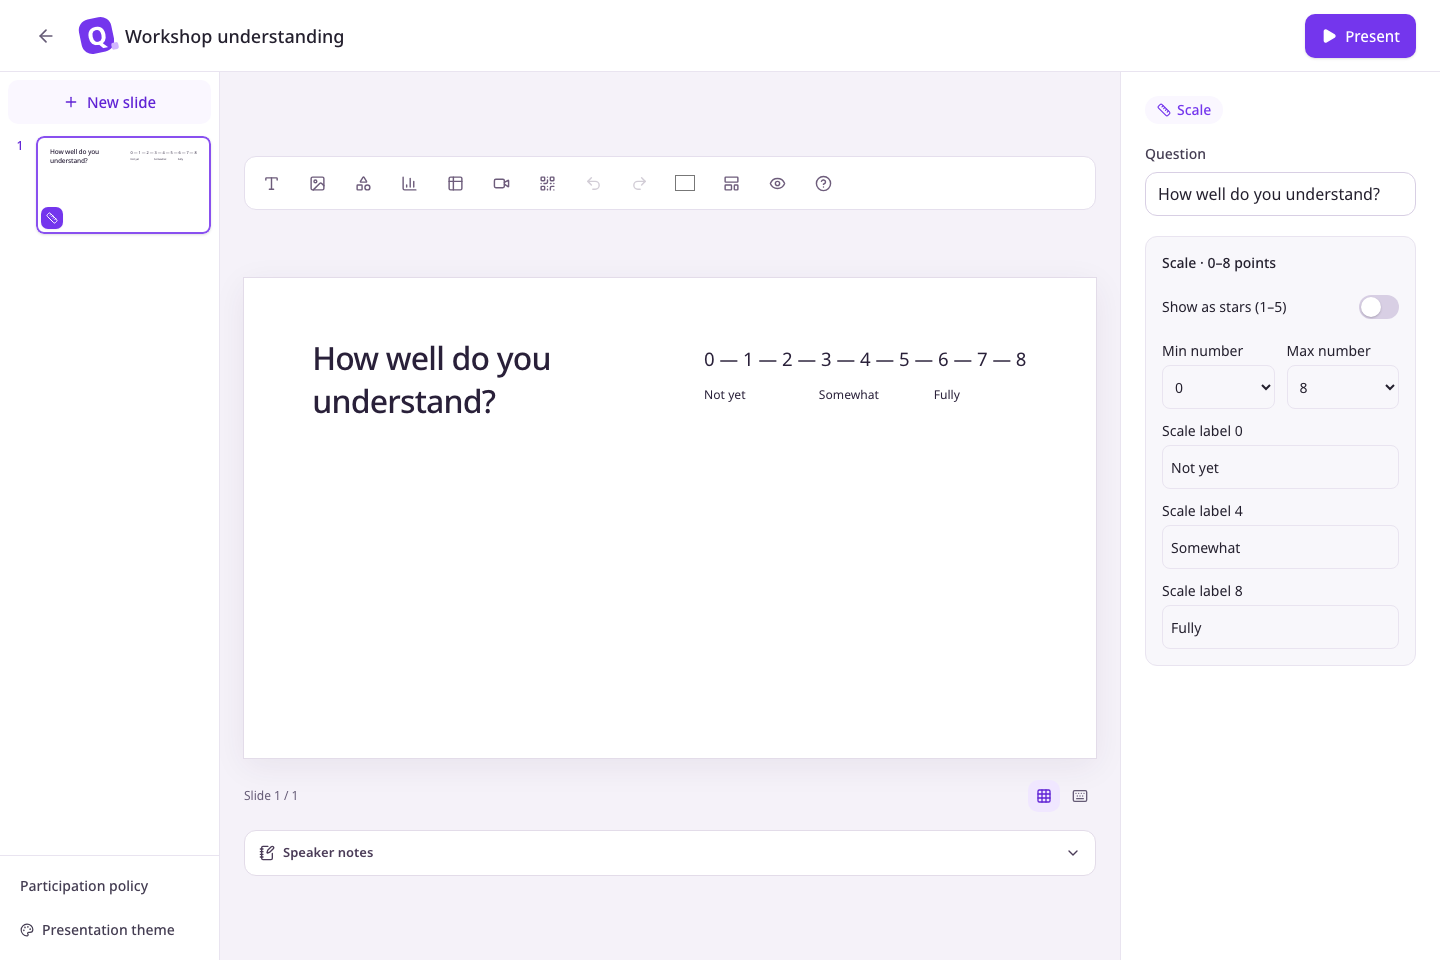
If the minimum meets or exceeds the maximum, the maximum moves one step higher. If the maximum meets or falls below the minimum, the minimum moves one step lower. The middle label is positioned at the average of the endpoints. For a 1–10 scale, this is 5.5; it is a descriptive position, not a selectable fractional answer.
Turn on Show as stars (1–5) to use stars. Turn it off to restore your numeric range; labels are retained. Existing numeric scales without a custom range remain 1–10, and default star ratings remain 1–5.
Wait for the saved status, then switch away and back to confirm the range and labels. If saving fails, check your connection and retry saving. Changing the range after collecting responses excludes out-of-range answers from the current average. Check the excluded count and raw CSV when comparing results.
Choose the live poll chart
Select a poll slide and open Content · Settings → Poll settings → Live result chart. Choose Bar, Doughnut, Pie, Dots, Flowing grid, or Speech bubbles. The editor screenshot above shows a doughnut chart with multiple selection enabled. Wait for the saved status, reopen the slide to confirm the selection, then choose Show results during the presentation to check the live chart. If saving fails, check your connection and retry.
Existing polls keep the bar chart. Changing the chart preserves choices, multiple-selection limits, responses, reports and CSV exports. Both charts use total selections as their percentage denominator. In multiple-selection polls, selections can exceed the number of people who answered. Doughnut charts apply to polls; quiz and scale results retain their existing displays.
Set the spinner's draw source
Select a Spinner wheel slide and open Content · Settings → Draw source. Manual entries keeps the existing behavior: enter choices and spin the wheel. Select Session participants to draw from people who have joined the live session. Manual entries are preserved and become available when you switch back.
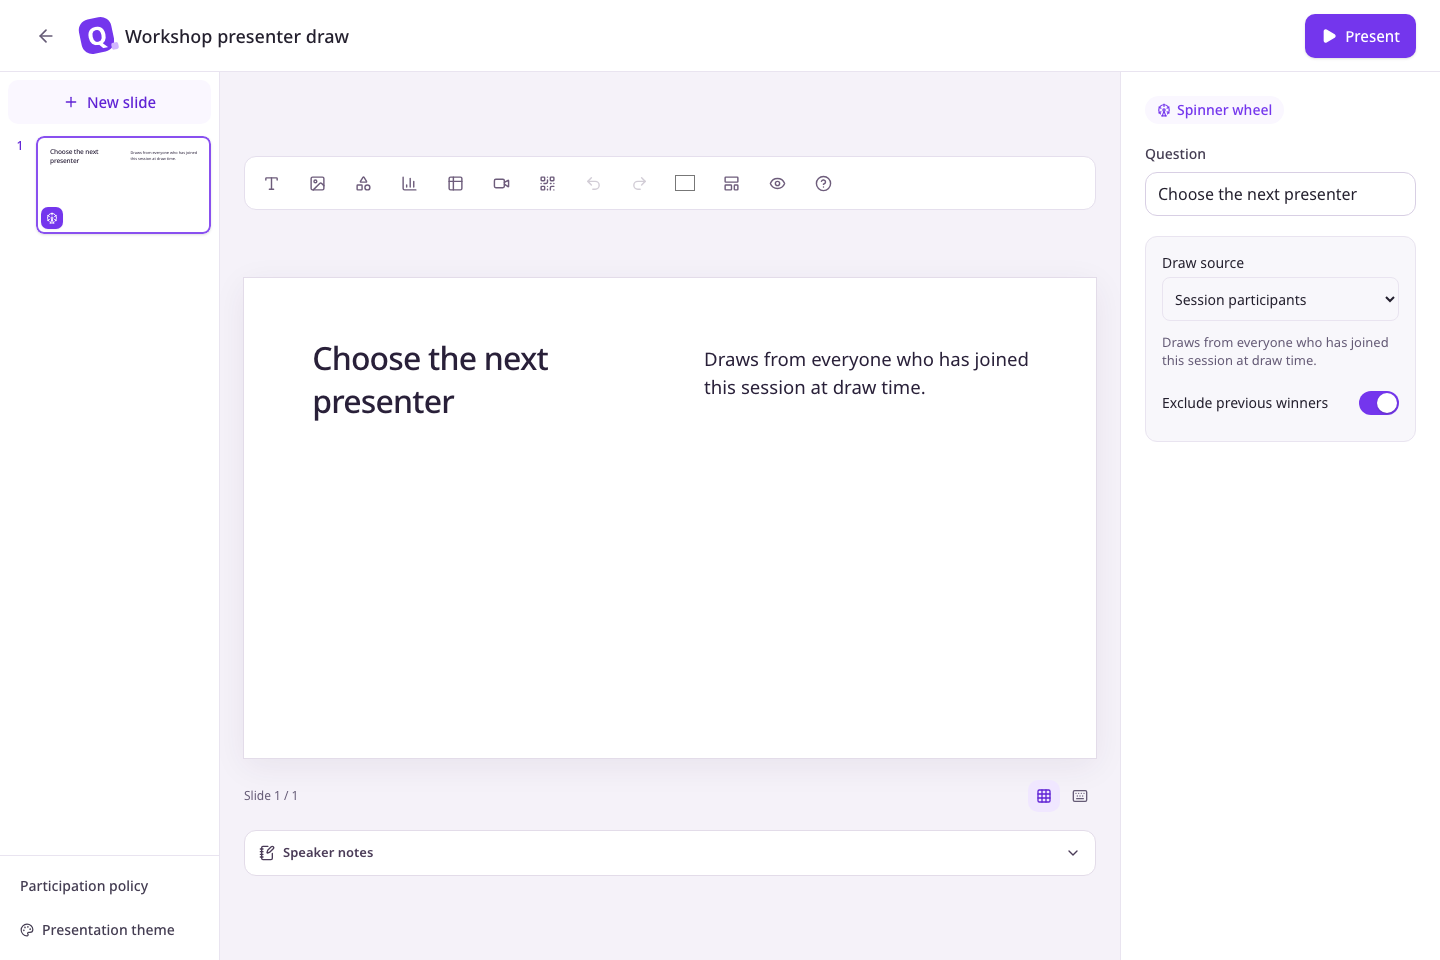
Enable Exclude previous winners to remove people selected earlier on this slide in this session from future draws. Disable it to allow repeat winners. Enabling it later also considers earlier participant draws. Wait for the saved status, then reopen the slide to confirm. If saving fails, check your connection and retry.
Candidates are everyone who has joined this session by the time of the draw, not just people currently online. Temporarily disconnected participants remain eligible. People who join later enter the next draw. Identical names still represent separate participants and are distinguished by a #number. Reconnecting through the existing participant record retains that identity.
Where Q&A approval applies
The active Q&A slide's approval setting applies to both its question form and the Q&A panel at the bottom of the participant screen. While a different slide type is active, questions from that panel wait for approval if any Q&A slide in the presentation requires approval. Otherwise, questions are published immediately.
Choose an open-ended result layout
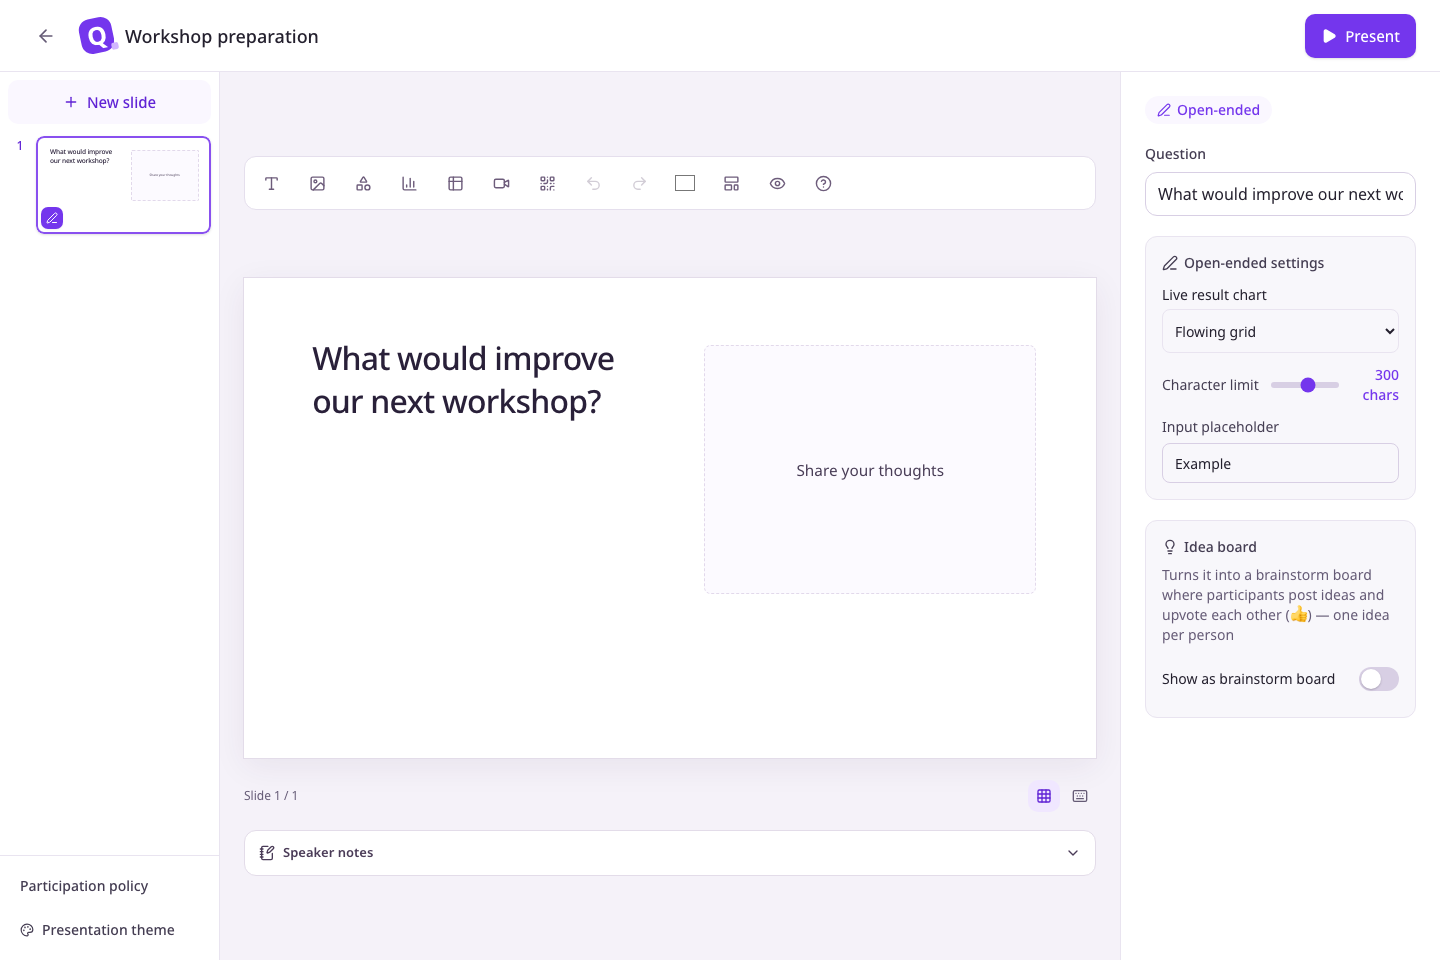
Select an ordinary open-ended slide and open Content · Settings → Open-ended settings → Live result chart. Choose List, Flowing grid, or Speech bubbles. For example, use Flowing grid to read short answers to “What would improve our next workshop?” side by side. Wait for the saved status, reopen the slide to confirm the choice, then check the answers during the presentation. The character limit and input placeholder stay unchanged. If saving fails, check your connection and retry.
On phones, Table, Video, and QR code are grouped under Add content (the grid icon). On a narrow desktop canvas, use More tools instead. Editing text or a table cell shows formatting in a separate row above the slide. Apply bold, color, or alignment, leave the editor, and check the save status.