Import a file
Import PPTX, PPT, or PDF files, understand conversion, choose pages, and resolve errors.
1. Check the file and feature availability
Use Import in your signed-in workspace. Supported formats are PPTX, PPT, and PDF, up to 100 MB. Empty files cannot be imported.
If the button is unavailable, open the adjacent import help. The feature may be unavailable or its availability may still be loading. If the settings check failed, select Check again. Existing presentations remain usable while import is unavailable.
2. Understand how conversion works
Standard import preserves source pages as images. You can add new elements to the imported slides, but the original text and shapes inside those images are not individually editable.
Where editable beta is enabled, PPTX files automatically use editable import. Convertible text and shapes can be edited; slides that cannot be reproduced faithfully may remain original page images. There is no separate mode-selection step. Do not expect the same editable conversion for PPT or PDF files.
3. Select and upload a file
- Select Import in the workspace.
- Choose one supported file. You can also drop it into the import area.
- Check its name and upload progress.
- Select Cancel upload if you need to stop the upload.
After transfer finishes, conversion begins on the server. Leaving the page during transfer can interrupt the upload, so wait until it finishes. A completed upload is not yet a completed presentation.
4. Read conversion progress and warnings
The job panel shows stages such as waiting, checking the source, converting pages, and saving the presentation. It may also show the source page count, processed pages, and quality warnings.
A message saying progress could not be checked does not establish whether conversion failed or was canceled. Select Check again to refresh status. Closing the panel hides it; it does not cancel the job. Select Cancel import when available to stop the job.
Quality notices show how many slides are editable, how many preserve the original as images, and why. When fonts are substituted, the explanation follows your selected language while original font names remain unchanged for comparison. Fonts substituted on different pages are gathered into one line that lists the first three names and how many more; if some names were already left out on a page, the line ends with "and others" instead of a count. Other notices, such as image colour conversion or downscaling, still appear when there are many font notices. If a file has a very large number of different font combinations across pages, some names are left out and the line ends with "and others".
5. Select pages when the file exceeds your limit
If the source has more pages than your current plan's slide limit, automatic import pauses for page selection.
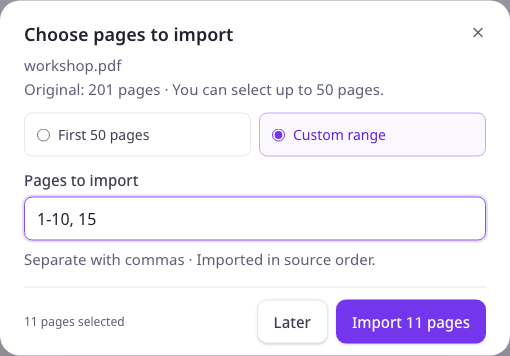
The selection dialog opens when a newly uploaded file reaches this stage. For a deferred job, select Select pages in the job list to reopen it.
- Check the filename, original page count, and selection limit.
- Choose First N pages, or choose Custom range and enter Pages to import. For example,
1-3, 5selects pages 1, 2, 3, and 5. - Review the selected count and select Import N pages. Empty input, invalid ranges, or selections over the limit disable this action.
- The dialog closes and the list shows conversion status after the request is accepted. If the request fails, read the error inside the dialog and try again.
Later, the close button, and Esc defer selection. Reopening the dialog in the same workspace screen preserves your input and selection mode. Refreshing or leaving the screen resets the input. To stop the import job itself, select Cancel import in the list. A canceled job cannot be resumed, and the uploaded source file is removed from storage shortly afterwards.
Page numbers start at 1. Numbers outside the source range and reversed ranges such as 5-2 are invalid. Duplicate numbers are counted once, and pages are imported in source order. The order in which you type numbers does not rearrange the slides.
6. Open and review the completed presentation
Once import is complete, select Open to enter the editor. Read any quality warnings, then check each page's fonts, line breaks, layout, and whether it was preserved as an image.
An editable beta badge does not mean every page became individual elements. Add any polls or quizzes you need with New slide. Import is not an automatic quiz-generation tool. See Edit slides for review and editing steps.
7. Resolve failures and waiting states
| Situation | What to do |
|---|---|
| File is rejected | Check the extension, that the file is not empty, and that it is at most 100 MB. |
| Transfer fails or stops | Check the connection and select the file again. |
| Waiting for page selection | Check the range and current limit, then import the selected pages. |
| Waiting for an automatic retry | Follow the displayed retry status. Avoid repeatedly uploading the same file before it finishes. |
| Import fails | Read the error and quality messages. Use the retry action if offered; otherwise check the file and import it again. |
| An older job is not visible | Expand Import history to review older completed jobs. |
8. Delete the source file and preview
Check the displayed automatic-deletion date or notice that source cleanup is paused. When source deletion is available, select Delete original file and read the Delete original permanently confirmation. Imported slides remain, but the deleted source cannot be converted again. Final cleanup can take time after the request.
Delete source and preview requests source deletion and removes preview and uninserted-image recovery. Images already inserted into slides remain, as does the job record. If you only want to hide the panel, close it instead of deleting source or recovery data.